


Upcycling kids’ clothing is a creative way to reuse old garments. This eco-friendly trend helps reduce waste and save money.
Every parent knows how quickly children outgrow their clothes. Instead of tossing out those too-small shirts and pants, why not transform them into something new? Upcycling offers a fun and sustainable solution. It’s a chance to give new life to worn-out items, sparking creativity and imagination.
Whether you’re turning a t-shirt into a pillowcase or old jeans into a tote bag, the possibilities are endless. Plus, it’s a great way to teach kids about sustainability and resourcefulness. Let’s explore some inspiring ideas to upcycle kids’ clothing into new, useful items. Ready to get crafty? Let’s dive in!
Credit: pomp.store
Introduction To Upcycling
Upcycling is the process of transforming old items into something new and useful. It is a creative way to recycle and repurpose materials. Upcycling kids’ clothing is a wonderful way to give old clothes a new life. It can be fun and rewarding.
Why Upcycle Kids’ Clothes?
Kids grow out of their clothes very quickly. This leaves parents with piles of outgrown garments. Instead of throwing these clothes away, consider upcycling them. Here are some reasons why you should upcycle kids’ clothes:
- Saves Money: Making new items from old clothes is cheaper than buying new ones.
- Environmentally Friendly: Upcycling reduces waste and helps the environment.
- Creative Outlet: It allows you to express your creativity and make unique items.
Benefits Of Upcycling
| Benefit | Description |
|---|---|
| Cost-Effective | Upcycling helps save money by reusing old materials. |
| Sustainable | It promotes sustainability by reducing the need for new materials. |
| Educational | Teaches kids about recycling and the value of reusing items. |
| Personalized | Creates unique, custom-made items that cannot be bought in stores. |
By upcycling, you contribute to a greener planet. You also teach your kids about the importance of sustainability. It’s a win-win situation for everyone.
Essential Tools And Materials
Upcycling kids’ clothing into something new is a fun and creative project. To get started, you will need some essential tools and materials. With the right supplies, you can transform old clothes into unique and functional items. Below, we cover the basic sewing supplies and creative add-ons you will need.
Basic Sewing Supplies
Having the right basic sewing supplies is crucial for any upcycling project. Here is a list of essential items:
- Sewing Machine: A basic model will do just fine.
- Needles: Get a variety of sizes for different fabrics.
- Thread: Keep various colors on hand to match different fabrics.
- Scissors: Sharp fabric scissors for cutting clean lines.
- Pins and Pin Cushion: To hold fabric pieces together before sewing.
- Measuring Tape: For accurate measurements.
- Seam Ripper: For correcting any mistakes.
- Iron and Ironing Board: To press seams and fabric pieces.
Creative Add-ons
Adding creative touches can make your upcycled items unique. Here are some materials to consider:
- Buttons: Mix and match for a playful look.
- Zippers: Use colorful zippers to add flair.
- Patches: Great for covering holes or adding decoration.
- Ribbons and Trims: Add these to hems and edges for a finished look.
- Fabric Paints and Markers: Customize your creations with designs and patterns.
- Appliqués: Sew or iron these on for extra detail.
With these tools and materials, you are ready to start your upcycling journey. Remember, the most important thing is to have fun and let your creativity flow!
Transforming T-shirts
Transforming old t-shirts into new items can be fun and creative. Kids outgrow their clothes fast. Instead of throwing away those t-shirts, turn them into useful items. This not only saves money but also helps the environment. Let’s explore some exciting ways to upcycle those old t-shirts.
From T-shirt To Tote Bag
Turning a t-shirt into a tote bag is easy. First, cut off the sleeves. Then, cut the neckline to make the bag opening. Next, turn the t-shirt inside out. Sew the bottom edge closed. Finally, turn it right side out. You now have a simple tote bag. It’s perfect for groceries or books.
Making A Pillow Cover
Old t-shirts can make great pillow covers. Choose a t-shirt with a fun design. Cut two squares from the t-shirt, both the same size. These will be the front and back of the cover. Place the squares together, with the design facing inside. Sew three sides together, leaving one side open. Turn it right side out. Insert the pillow. Sew or use fabric glue to close the final side. Your new pillow cover is ready.
Repurposing Jeans
Repurposing jeans is a great way to breathe new life into old clothes. Kids grow fast, and their jeans often wear out quickly. Instead of tossing them, turn them into something new. Upcycling jeans can be fun and creative. Plus, it’s eco-friendly. You can create new items that kids will love to wear. Let’s explore two easy projects: creating denim shorts and making a jean skirt.
Creating Denim Shorts
Turning old jeans into shorts is simple. Start by measuring the desired length. Use a ruler and chalk to mark the cutting line. Cut the legs off straight across. You can leave the edges raw for a casual look. Or, you can fold and hem them for a cleaner finish. Add some personal touches. Stitch on patches or add fabric paint. Your kids will have fun, unique shorts.
Making A Jean Skirt
Making a jean skirt from old jeans is another great project. Cut the jeans at the crotch. Remove the inner seams to open up the fabric. Lay the jeans flat and overlap the front and back pieces. Sew the pieces together. Trim any excess fabric. Add a decorative touch with lace or ribbon. Your child will have a stylish skirt in no time.
Turning Dresses Into Skirts
Turning old dresses into skirts is a fantastic way to upcycle kids’ clothing. This method gives a new life to garments that might otherwise be discarded. It saves money and promotes creativity. Let’s explore how to transform dresses into skirts easily.
Simple Skirt Conversion
First, choose a dress that still has a good fabric. Measure the length from the waist to the desired skirt length. Cut the dress at this point. Ensure to leave an extra inch for the hem. Fold the top edge down about half an inch. Sew it to create a clean waistband. Add an elastic band to the waistband. This will help the skirt fit snugly around the waist. And there you have it, a simple skirt.
Adding Embellishments
Enhance the skirt’s look with some creative embellishments. Sew on some lace trim along the hem for a delicate touch. Add fabric flowers or patches for a playful look. Use fabric paint to create unique designs. Sequins can add a bit of sparkle. Let your child’s personality shine through these little details. It is fun, and it makes the skirt unique.
Sweaters Into Mittens
Transforming old sweaters into mittens is a fun, eco-friendly project. It’s a fantastic way to repurpose your child’s outgrown clothing. Plus, you get unique, cozy mittens perfect for winter. This activity can be a bonding moment with your kids while teaching them about upcycling.
Cutting And Sewing Techniques
Start by laying the sweater flat on a table. Trace your child’s hand with a marker, leaving a half-inch border for sewing. Cut along the traced line carefully. You will need two pieces for each mitten, a front and a back.
Pin the pieces together with the right sides facing each other. Sew along the edges, leaving the wrist area open. Use a simple running stitch or a sewing machine if available. Turn the mittens right side out. Check for any loose threads and trim them.
Decorative Elements
Add some fun elements to make the mittens special. Sew on buttons, patches, or small fabric shapes. Embroider simple designs like stars or hearts. Use fabric paint to create colorful patterns.
Consider adding a lining for extra warmth. Use soft fabric like fleece. Cut the lining pieces the same way as the outer mitten. Sew them together and insert them into the mittens. Secure the lining at the wrist with a few stitches.
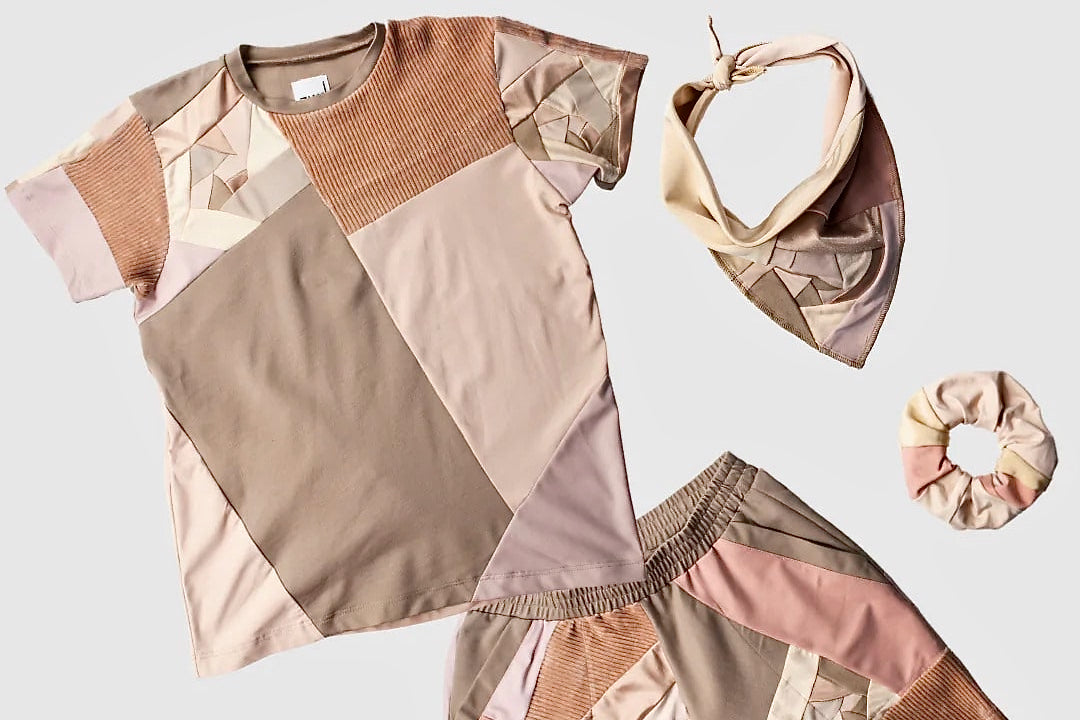
Crafting With Fabric Scraps
Crafting with fabric scraps can be a fun and creative way to reuse old kids’ clothing. Instead of throwing away those little pieces of fabric, turn them into something new and exciting. This process not only helps reduce waste but also allows you to create unique items. Let’s dive into some inspiring ideas for upcycling fabric scraps.
Patchwork Projects
Patchwork projects are perfect for using up small pieces of fabric. You can create beautiful quilts, pillows, or even tote bags. Simply sew the fabric scraps together in a pattern that you like. This method allows you to mix and match different colors and textures. The end result is always a one-of-a-kind creation.
Fabric Scrap Accessories
Fabric scraps can also be turned into fun accessories. Consider making headbands, bracelets, or hair ties. These small projects are easy to do and can be completed quickly. You can even involve your kids in the process. They will love wearing something they helped create.
Another idea is to make fabric flowers. These can be used to decorate clothing, bags, or even as brooches. Simply cut the fabric into petal shapes and sew them together. Add a button or bead in the center for a finishing touch.
Creating Costumes
Transforming old kids’ clothes into unique costumes can be both fun and sustainable. Imagine turning a worn-out shirt into a superhero cape or a pair of leggings into a fairy tale dress. These DIY projects not only save money but also provide hours of creative fun for both parents and children. Let’s dive into how you can create these magical costumes at home.
Diy Superhero Cape
Every child dreams of being a superhero. You can make this dream come true with an old t-shirt. Follow these simple steps:
- Find an old, oversized t-shirt.
- Cut straight up the middle of the back.
- Trim the sleeves off to create the cape shape.
- Decorate with fabric paint, markers, or patches.
For added flair, use velcro or a button to fasten the cape around the neck. This makes it easy to put on and take off. Your child will love zooming around as their favorite superhero.
Fairy Tale Dress
Creating a fairy tale dress from old clothes can be magical. Here’s how you can do it:
- Gather a few old dresses or skirts.
- Cut and combine different fabrics for a layered effect.
- Use ribbon or lace to add decorative elements.
- Sew or use fabric glue to attach the pieces together.
Add a simple tiara made from craft supplies. You now have a perfect dress for a princess or fairy. Your child will enjoy pretending to be in their favorite story.
These projects are not just about recycling. They are about creating memories and sparking imagination. Start upcycling today and see the magic unfold!
Decorating With Dye
Upcycling kids’ clothing is a great way to save money and reduce waste. One creative way to refresh old clothes is by decorating with dye. This method allows you to add color and patterns, making old garments look brand new.
Tie-dye Techniques
Tie-dyeing is a fun and easy method. It involves tying parts of the fabric with rubber bands and then applying dye. The tied areas resist the dye, creating unique patterns. Here’s how to get started:
- Gather your materials: dye, rubber bands, gloves, and plastic sheets.
- Choose the clothing you want to dye.
- Prepare the dye according to the instructions.
- Twist and tie the fabric with rubber bands.
- Apply the dye to the fabric.
- Let the dye set for the recommended time.
- Rinse the fabric and remove the rubber bands.
- Wash and dry the fabric separately.
Ombre Effect
The ombre effect gives a gradient look to the clothing. It transitions from one color to another, creating a beautiful blend. Here’s how you can achieve this effect:
- Prepare your dye and clothing.
- Fill a bucket with water and add dye.
- Dip the bottom of the clothing into the dye.
- Leave the garment in the dye for a few minutes.
- Slowly lift the clothing, allowing the dye to fade up the fabric.
- Rinse the clothing thoroughly.
- Wash and dry the garment separately.
Both tie-dye and ombre techniques can transform old clothes into vibrant new pieces. Experiment with colors and patterns to create unique designs. Happy dyeing!

Credit: www.youtube.com
Personalizing With Paint
Looking for a creative way to give your kids’ clothing a new life? Personalizing with paint is an excellent way to upcycle. It’s fun, easy, and lets your child’s personality shine through their clothes. Let’s dive into the basics of fabric paint and stencil designs.
Fabric Paint Basics
Fabric paint is specially made to bond with fibers. It stays vibrant after many washes. Before you start, make sure you have:
- A clean workspace
- Old newspapers or a drop cloth
- Fabric paints in your chosen colors
- Brushes or sponges
Pre-wash the clothing to remove any dirt or chemicals. Lightly iron the garment to smooth out wrinkles. This makes painting easier. Always test the paint on a small, hidden part of the fabric first. This helps you see how it interacts with the material.
Stencil Designs
Stencils can help create clean, professional-looking designs. You can buy pre-made stencils or make your own. Here’s a simple guide:
- Choose your design
- Print it on thick paper or cardstock
- Cut out the design with a craft knife
Place the stencil on the clothing and secure it with masking tape. Use a sponge or brush to apply the paint. Start with light layers and build up the color. Remove the stencil carefully before the paint dries. Let the paint dry completely before wearing or washing.
With these tips, you can turn old clothes into unique treasures. Happy painting!
Adding Patches And Appliques
Adding patches and appliques is a great way to upcycle kids’ clothing. It adds a touch of creativity and extends the life of garments. There are two popular methods to apply patches and appliques: iron-on patches and hand-sewn appliques.
Iron-on Patches
Iron-on patches are an easy and quick way to fix or decorate clothing. They come in many designs, from cartoon characters to simple shapes.
| Step | Instructions |
|---|---|
| 1 | Choose a patch that your child likes. |
| 2 | Place the patch on the clothing. |
| 3 | Heat your iron to the cotton setting. |
| 4 | Cover the patch with a thin cloth. |
| 5 | Press the iron on the patch for about 30 seconds. |
| 6 | Allow the patch to cool and check if it adheres well. |
Iron-on patches can be used on jackets, jeans, and even backpacks. They are durable and add a fun element to any outfit.
Hand-sewn Appliques
Hand-sewn appliques offer a personalized touch. This method requires some sewing skills but results in a unique design.
- Choose fabric with interesting patterns or colors.
- Cut out shapes like stars, hearts, or animals.
- Pin the applique onto the clothing.
- Use a needle and thread to sew around the edges.
- Opt for contrasting thread colors to make the applique stand out.
Hand-sewn appliques are perfect for covering stains or holes. They also allow for creative expression. Kids love to see their favorite shapes or characters on their clothes.
With these techniques, you can give old clothes a new life. Whether you choose iron-on patches or hand-sewn appliques, the result is a fun and personalized piece of clothing.
Making Accessories
Upcycling kids’ clothing into new accessories is a fun and creative way to give old clothes a second life. Instead of tossing outgrown or worn-out clothes, transform them into unique items. This activity also teaches children about sustainability and creativity. Let’s explore some simple ways to make accessories.
Hair Bows And Bands
Old shirts or dresses can become cute hair bows and bands. Cut the fabric into strips. Fold and stitch to form a bow shape. Attach the bow to a hair band or clip. You can mix and match different fabrics for a colorful look. This project requires minimal sewing skills. Kids can help with choosing fabrics and colors.
Fabric Bracelets
Use leftover fabric to make stylish bracelets. Cut the fabric into long, thin strips. Braid or twist the strips together. Add beads or charms for extra flair. Secure the ends with a small knot or button. These bracelets can be personalized with different patterns and colors. They make great gifts for friends and family.
Final Touches
Once you have transformed old kids’ clothing into something new, it’s time for the final touches. This step ensures your upcycled creation looks polished and complete. These last details make a huge difference in the overall appearance.
Finishing Techniques
To give your upcycled items a professional look, consider these finishing techniques:
- Hemming: Neatly hem the edges to prevent fraying and create a clean finish.
- Topstitching: Add topstitching along the seams for extra durability and a refined look.
- Trimming: Use decorative trims, ribbons, or lace to add unique details.
- Pressing: Press all seams and hems with an iron for a crisp, neat appearance.
Showcasing Your Creations
Once your upcycled clothing is complete, showcase your creations to inspire others. Here are a few ways to do this:
- Photos: Take high-quality photos in natural light to highlight the details.
- Social Media: Share your work on platforms like Instagram or Facebook to reach a larger audience.
- Craft Fairs: Participate in local craft fairs to display and sell your items.
- Blog: Write about your upcycling process and share tips with your readers.
These final touches make your upcycled kids’ clothing stand out. They add a touch of professionalism and creativity that can’t be missed. Happy upcycling!

Credit: craftworld.com
Frequently Asked Questions
What Is Upcycling Kids’ Clothing?
Upcycling kids’ clothing means reusing old clothes to make new items. It reduces waste and saves money.
How Can I Start Upcycling Kids’ Clothing?
Begin by sorting through old clothes. Identify pieces that can be reused. Get creative with designs and ideas.
What Materials Do I Need For Upcycling?
You need basic sewing tools, old clothes, and accessories like buttons or patches. No expensive equipment required.
Why Should I Upcycle Kids’ Clothing?
Upcycling saves money, reduces waste, and fosters creativity. It’s eco-friendly and teaches kids the value of reuse.
Conclusion
Upcycling kids’ clothing breathes new life into old garments. It saves money and reduces waste. Plus, it’s fun and creative. Kids enjoy seeing their clothes transformed. You also teach them about sustainability. Remember, every small effort counts. So grab those old clothes and start upcycling today.
Your kids and the planet will thank you.


